How to develop create and update plugin for Dynamics CRM 2013
In this blog post I will cover how to develop, create and update plug-in for Microsoft Dynamics CRM 2013.
Prerequisite – Dynamics CRM 2013 SDK
You first need to install Dynamics CRM 2013 SDK, which you can download from this location
You will need to use Visual Studio 2012. This version of Dynamics CRM 2013 SDK does not support Visual Studio 2013.
There are some workarounds but the best way is to simply use Visual Studio 2012.
Creating plug-in for Dynamics CRM 2013
First, we need to create Dynamics CRM plugin project. We will use Visual Studio templates that we got installing the CRM SDK.
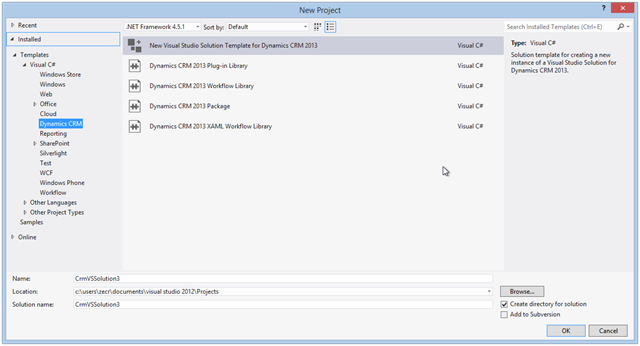
In Visual Studio go to Dynamics CRM and choose “New Visual Studio Solution Template for Dynamics CRM 2013” like on the picture bellow.
After you enter solution name and hit OK, you will be prompted to provide a path to the CRM server, log-on details, organization and solution name.
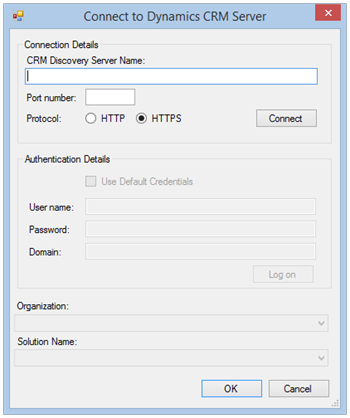
I recommend that you provide these information’s.
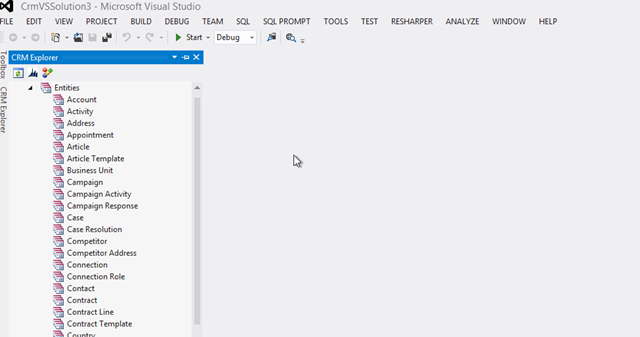
This will be used to connect with CRM from Visual Studio using CRM Explorer, which greatly improves the process of creating CRM plugins.
In solution explorer you will get two projects : Plug-in project and Workflow project together with CRMPackage project, which will be used for deployment of projects.
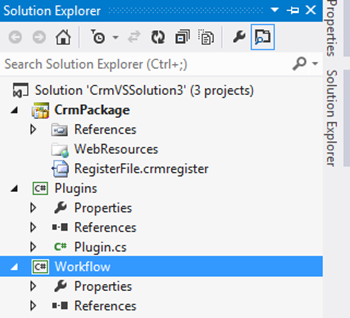
Inside CRMPackage project is important file called RegisterFile.crmregister which contains registration data for any plugin or workflow created in your solution.
In this case we will not create any workflows so we can safely remove Workflow project. (This is recommended because it can cause issues with deploying a plugin later)
When you remove the Workflow project you also need to manually remove a Workflow part from RegisterFile.crmregister file.
NOTE: If you got message like this “Error registering plugins and/or workflows. Plug-in assembly does not contain the required types or assembly content cannot be updated.”
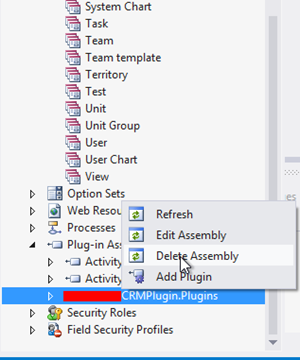
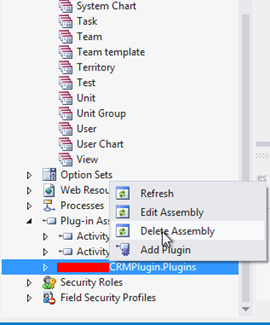
You have already deployed plugin to CRM and you will need to manually remove plugin Assembly from CRM like on the picture bellow to before you successfully remove Workflow project.
Create insert plug-in for Dynamics CRM 2013
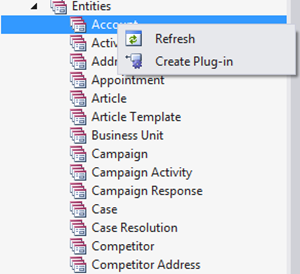
To develop create / insert plugin for Dynamics CRM 2013 you need to right click on the entity you want to create a plugin for. After this, choose “create plugin” in a CRM Explorer like on picture.
To generate “Insert / Create plugin” choose pipeline stage Post-Operation and message Create.
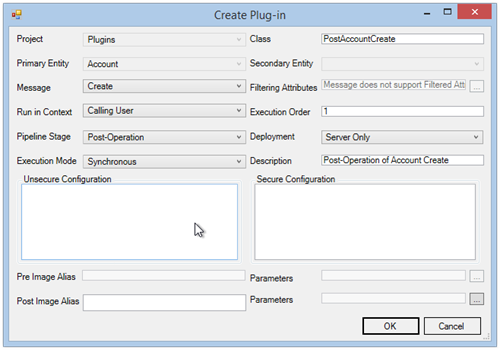
This will generate class “PostAccountCreate” which inherits “Plugin” class.
Now I will show how to create a plugin for entity Municipality, which is more complicated and contains OptionSet and lookup fields.
This create, update plugin is used to call our REST Web API to exchange data between CRM and our third party system.
If you want to learn more about programming CRM Dynamics 2013 I recommend a great book that I love written by real expert:
Microsoft Dynamics CRM 2013 Unleashed
Optionally, you can use plugins to change some fields before saving or do some other custom business logic.
  protected void ExecutePostMunicipalityCreate(LocalPluginContext localContext)
        {
            if (localContext == null)
            {
                throw new ArgumentNullException("localContext");
            }

            var context = localContext.PluginExecutionContext;
            // if user is our web api user return to prevent recursive call
            if (context.InitiatingUserId.ToString().Equals("2f2c9848-194a-e411-80cc-00155d0c03cf"))
            {
                return;
            }

            IOrganizationService service = localContext.OrganizationService;

            if (context.InputParameters.Contains("Target") && context.InputParameters["Target"] is Entity)
            {
                Entity entity = (Entity)context.InputParameters["Target"];
                if (entity.LogicalName == "new_municipality")
                {
                    try
                    {
                        if (entity.Attributes.Contains("new_name") && entity.Attributes.Contains("new_id") && entity.Attributes.Contains("new_statepart") && entity.Attributes.Contains("new_regionid"))
                        {
                            CustomMunicipality d = new CustomMunicipality();
                            d.Mun_Name = (string)entity.Attributes["new_name"];
                            d.Mun_Id = (string)entity.Attributes["new_id"];

			    // here we grab optionset value
                            d.Mun_StatePart = entity.GetAttributeValue<OptionSetValue>("new_statepart").Value.ToString();
			    // here we grab lookup value for field region
                            d.Mun_Region = (string)entity.Attributes["new_regionid"];

			    // here we call our external web api and pass municipality entity to be created
                            var customMunicipalityRepository = new CustomMunicipalityRepository();
                            var result = customMunicipalityRepository.Insert(d);

                            if (!string.IsNullOrWhiteSpace(result))
                            {
                                throw new InvalidPluginExecutionException("Error with calling Web API occured: " + result);
                            }
			    // We do not call service to update entity becouse no data in entity is changed. If we need to change entity fields before save do so like this:
			    // entity.Attributes["new_name"] = "My new name";
			    // and then call service to update previously created entity
                            // service.Update(entity);
                        }
                        else
                        {
                            throw new InvalidPluginExecutionException("Some required field missing");
                        }

                    }
                    catch (FaultException ex)
                    {
                        throw new InvalidPluginExecutionException("An error occured in create plugin: " + ex.ToString());
                    }
                    catch (Exception ex)
                    {
                        throw new InvalidPluginExecutionException("An error occured in create plugin: " + ex.ToString());
                    }
                }
                else
                {
                    throw new InvalidPluginExecutionException("Entity does not exists");
                }
            }
        }
Any kind of exception that occurs in plugin will prevent entity from create or update.
To prevent infinitive loop call we check the InitiatingUserId property on context to check if call is made from our Web API.
In previous version of CRM we had a property called CallerOrigin but this property is removed.
If we have an infinitive loop call where the plugin is calling another plugin we should check if context.Depth > 1
Create update plug-in for Dynamics CRM 2013
For update plugin we need to choose Pipeline-stage “Pre-Operation” and Message “Update” to be sure that we can access field values on the Dynamics CRM form before they are updated.
        protected void ExecutePreMunicipalityUpdate(LocalPluginContext localContext)
        {
            if (localContext == null)
            {
                throw new ArgumentNullException("localContext");
            }

            var context = localContext.PluginExecutionContext;


            // if user is our Web API user return to prevent recursive call
            if (context.InitiatingUserId.ToString().Equals("2f2c9848-194a-e411-80cc-00155d0c03cf"))
            {
                return;
            }

            IOrganizationService service = localContext.OrganizationService;

            if (context.InputParameters.Contains("Target") && context.InputParameters["Target"] is Entity)
            {
                Entity entity = (Entity)context.InputParameters["Target"];
                if (entity.LogicalName == "new_municipality")
                {
                    try
                    {
			// here we grab entity values before user has changed fields on CRM form
			// value true here means we return all columns
                        ColumnSet attributes = new ColumnSet(true);
                        var oldEntity = service.Retrieve(entity.LogicalName, entity.Id, attributes);
			// here we grab old entity ID which will be used to update entity in our Web API
                        string id = (string)oldEntity.Attributes["new_id"];

                        CustomMunicipality d = new CustomMunicipality();
                        d.Mun_id = (string)oldEntity.Attributes["new_id"];
                        d.Mun_Name = (string)oldEntity.Attributes["new_name"];
                        d.Mun_StatePart = oldEntity.GetAttributeValue<OptionSetValue>("new_statePart").Value.ToString();
                        d.Mun_Region = (string)oldEntity.Attributes["new_regionid"];

                        if (entity.Attributes.Contains("new_id"))
                        {
                            d.Mun_id = (string)entity.Attributes["new_id"];
                        }

                        if (entity.Attributes.Contains("new_name"))
                        {
                            d.Mun_Name = (string)entity.Attributes["new_name"];
                        }

                        if (entity.Attributes.Contains("new_statePart"))
                        {
                            d.Mun_StatePart = entity.GetAttributeValue<OptionSetValue>("new_statePart").Value.ToString();
                        }

                        if (entity.Attributes.Contains("new_regionid"))
                        {
                            d.Mun_Region = (string)entity.Attributes["new_regionid"];
                        }

			// here we call our REST web api to update entity
                        var customMunicipalityRepository = new CustomMunicipalityRepository();
                        var result = ocustomMunicipalityRepository.Update(id, d);

                        if (!string.IsNullOrWhiteSpace(result))
                        {
                            throw new InvalidPluginExecutionException("Error during Web API Call:" + result);
                        }

			// we can also change entity fields and called update on those fields
			// entity.Attributes["new_name"]= "Some name";
			// entity.Attributes["new_statePart"] = new OptionSetValue(3);
                        // service.update(entity)
                    }
                    catch (FaultException ex)
                    {
                        throw new InvalidPluginExecutionException("An error occured in update plugin: " + ex.ToString());
                    }
                    catch (Exception ex)
                    {
                        throw new InvalidPluginExecutionException("An error occured in update plugin:" + ex.ToString());
                    }
                }
                else
                {
                    throw new InvalidPluginExecutionException("No entity with that name");
                }
            }
        }
Publish plugin to Dynamics CRM 2013
To publish plugin you need to first sign Plugins project assembly using the strong name key file.
You can read more about signing assembly in this MSDN article.
After you have signed Plugins assembly you just need to right click CRMPackage project and choose “deploy”.
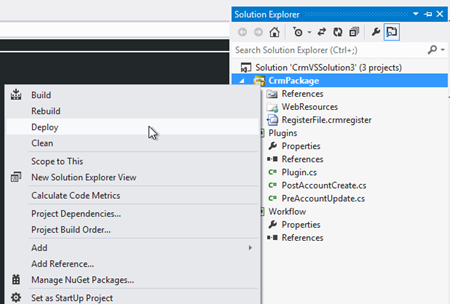
After this your plugin should be deployed to your CRM server, you have connected before using CRM explorer.
To un-deploy or delete the plugin from CRM server, you can again use CRM Explorer and choose “Delete assembly” from “Plug-in assemblies”.
If you like this article don’t forget to subscribe to this blog and make sure you don’t miss new upcoming blog posts.
